Environmental monitoring with a RP2040 W
I’ve been developing for embedded systems since college. That was in the bad old days prior to the release of the first Arduino; compiling for a microcontroller meant a ton of confusing work getting a toolchain set up, figuring out how to actually flash the thing, and probably setting up a bunch of passive support components. Dev boards existed but they were usually out of the price range of a poor college student.
Arduino changed all that. For a goodly amount of time you were really looked down upon in the hacker community for taking the easy route and slapping an Arduino in your project, but it really did start a maker/hacker revolution just by making embedded work so easy. It’s been a hot minute since I’ve touched anything that’s Arduino-y - most of my hobby work is on Pis and the like - but for setting up a way to monitor temperature, humidity, etc. in my garage with easy Home Assistant integration, esphome is the way to go.
I’m genuinely amazed at how simple this has become.
This is all there is to it.
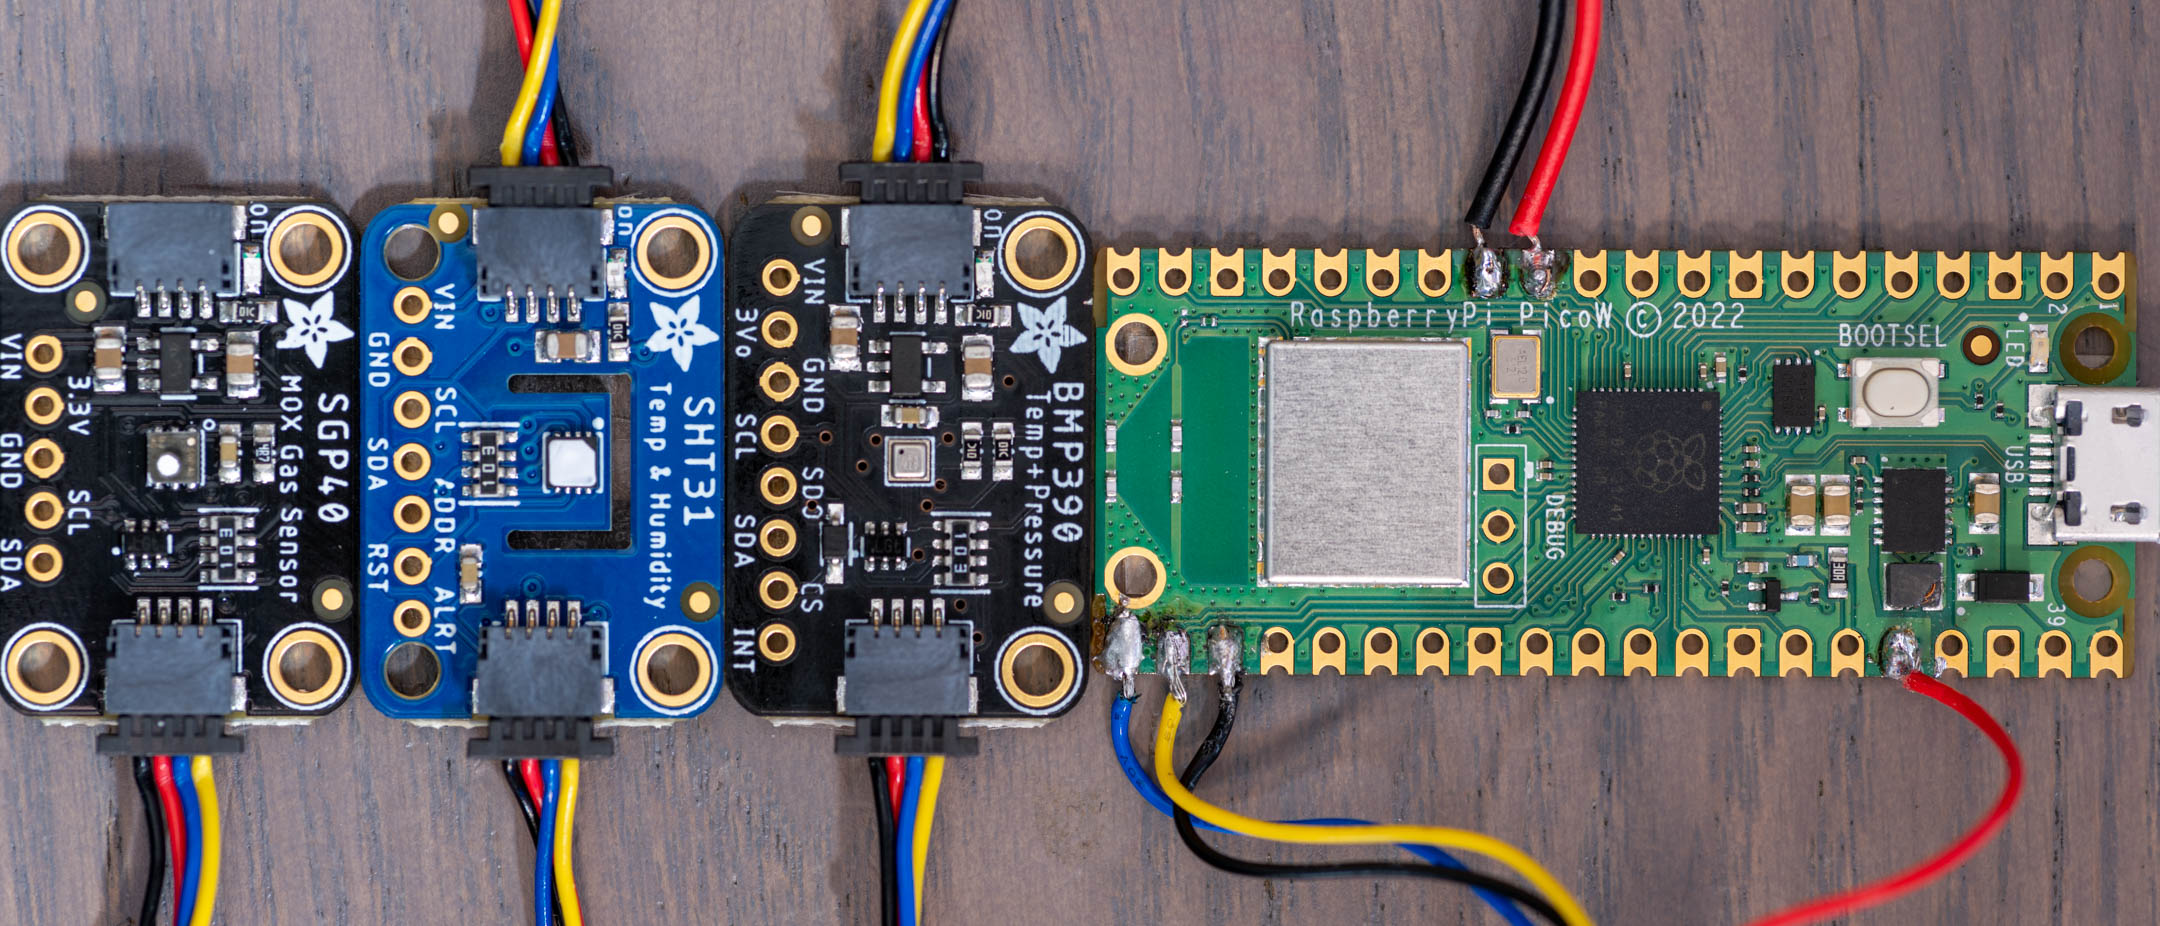
- Buy a microcontroller and a couple of sensors from Adafruit.
- Plug everything in.
- Create a yaml configuration file for esphome.
- There is no step 4. You’re done now. Plug the device in and it will be auto discovered by Home Assistant and everything will just work.
OK, so it wasn’t quite that easy. Nothing ever is. But it sure was nearly that easy. And it would have been if I picked up an ESP32 with a qwiic connector instead of a Raspberry Pi Pico W.
Raspberry Pi Pico W
For ease of use with esphome, an ESP32 is the way to go, but I wanted to try something new. The 2021 release of the Raspberry Pi Pico was interesting, but its lack of integrated wireless made it a bit of a non-starter for these types of IoT projects. In 2022 we got the Pi Pico W, which is a Pico with a wireless chip slapped on it.
The hardware of the Pico itself is a little odd. Flashing is simple: hold down the BOOTSEL button when plugging it in, and it shows up as a USB mass storage device. Drop your firmware on there and it will flash, verify, and reboot. Other than that, we get 30 GPIOs, 2 hardware UARTs, 2 SPI controllers, 2 I2C controllers, a USB 1.1 PHY, 16 PWMs, and 8 PIO state machines which are an odd but highly performant alternative to bit-banging an interface. All I really care about is an I2C bus and some way to transfer over the network, which I get. No floating point or DSP (this is no Teensy) but the fp math I’m doing is minimal and I’m not doing any real signal processing here.
Oh, and unlike other Pis, you can buy it, at retail price from pretty much anywhere. $6 will get you one of your very own.
Problems
RP2040 support is fairly experimental in esphome right now. Not every library written for ESP is going to work on RP2040, the documentation is quite poor, and you have to put up with some workarounds to get this running, but it’s not that bad. Jeff Geerling wrote a blog on this a little while ago, and the situation is slightly better since then, it’s still not great by any means.
The missing library support is painful. There’s no MQTT support, and
ESPAsyncWebServer and friends won’t work without extensive rewrites. The devs
for esphome have done a pretty good job of disabling unsupported functionality,
but occasionally you’ll still run into compile bugs. I worked around most of
these.
Pi Platform
This isn’t very well documented on the esphome site, but in order for this to work you’ll have to add this to your yaml file in place of any esp directives.
rp2040:
  board: rpipicow
  framework:
    platform_version: https://github.com/maxgerhardt/platform-raspberrypi.git
That’s rpipicow, not pico as Jeff has in his blog.
Development on Windows, flashing, and OTA updates
AFAICT, OTA updates aren’t yet supported on the RP2040 in esphome. That’s fine,
I really don’t like the idea of OTA updates anyway, but it makes updating some
devices inconvenient. In order to flash firmware on the Pico you have to hold
down the BOOTSEL button when plugging it in, and esphome’s run command
tries to upload and reboot on its own. I use the compile command instead, and
manually drag the firmware artifacts onto the device myself.
Speaking of which, esphome is designed for development on not Windows, but it’s
fairly straightforward to get it done in a Docker container. I prefer vscode for
my work, so I set up a .devcontainer.json file which works quite well on
Windows.
{
  "name": "esphome",
  "privileged": true,
  "mounts": [
    { "source": "${localWorkspaceFolder}", "target": "/config", "type": "bind" }
  ],
  "init": true,
  "image": "esphome/esphome",
  "containerEnv": { "TZ": "America/Los_Angeles" },
  "features": {
    "ghcr.io/devcontainers/features/common-utils:2": {
      "configureZshAsDefaultShell": true,
      "username": "none"
    }
  },
  "postAttachCommand": "zsh"
}
This will plop me right in a console session and I can run esphome all day.
Local components
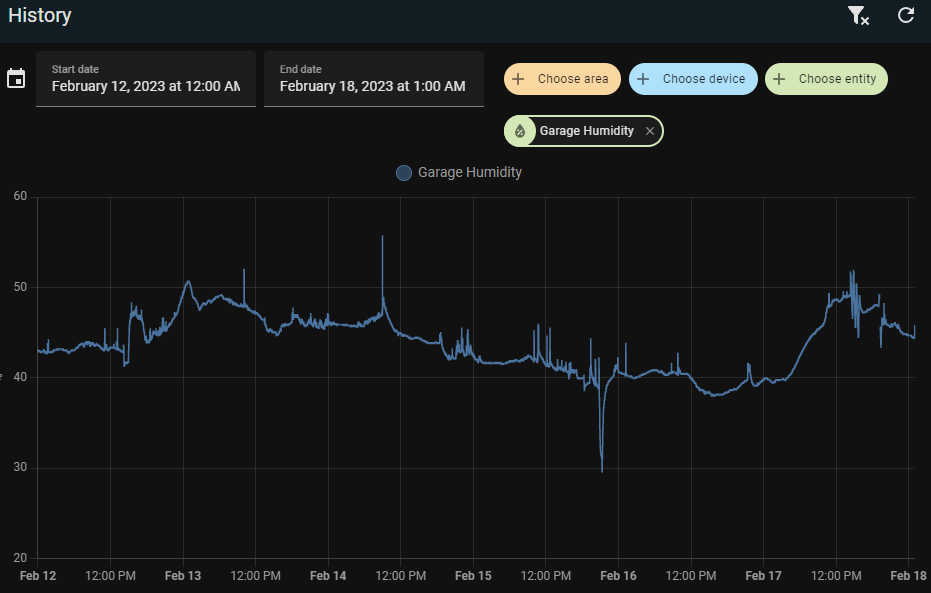
This is all you need for a basic setup communicating to Home Assistant over the native esphome protocol. It’s even auto discovered! But maybe you’re not running HA and maybe you just want this thing to have a web page where you can read your sensors.
Problem there. The web_server component uses code that will only work on an
ESP, not the RP2040. Luckily, someone ported
ESPAsyncWebServer and ESPAsyncTcp to the RP2040! And they mostly use the
same syntax. Minor changes to esphome are required for these to work, but
esphome has made it super easy to override internal components with custom
ones using a local_components folder. I was able to mostly drop in
AsyncWebServer_RP2040W without much difficulty and it compiled fine.
My local component changes and the config I’m using for my garage sensors are available on GitHub.

- Previous: Making GitHub deploy this site